|
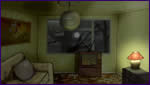
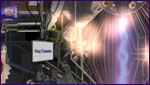
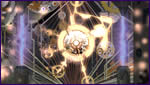
The Fantasy Factory
The main factory level is made up of 6 levels, all separated in 3D space to give depth. Interspersed with these are cog levels. Here I re-used 1 of only 4 cog drawings many times over. The same cogs were re-used for the central Device, otherwise composed of 13 elements, 11 of which were armatures. Within Scene Planning, all the environmental cogs were simply attached to pegs which rotate over time. For the Device, the armatures were first rotated around the central pivot point on their own pegs, then the cogs, already rotating on their own pegs, were parented to the armatures. The Device was then rendered out on the spot as embedded .tga files in order that the bitmapped results could be re-inserted and reduced in size to create the smaller cogs in the centre without any further peg work. It was then a matter of creating a repetitive E/W peg move for a piston device and finalising the camera move - a pan from far left through to the final resting position. Then I moved to USAnimation's Camera where I set up all my FX. First of all I assigned bitmap textures to nearly every separate colour region of each environmental level. Sequences of .tga files were also texture mapped into the screens in shot to show moving images from our showreel. To enhance the 3D look of the piping and various other objects, I used their own mattes to manufacture automatic tones and highlights within the programme. This method is also used to get the glass hemisphere effect in the Device. I also used a Drop Focus module to change my point of focus and enhance depth over time. The final steps were in tandem - adjusting the colour HSV & RGB values of each plane, and of the whole scene, whilst creating lighting effects. I provided animation for the plasma streams, as I had for the rotating screens which I staggered, flipped and flopped before adding 2 separately coloured glows. I then put this effect through an 'add grain' module to create the crackly, fizzy look I wanted for what would be highly ionised air. Naturally enough there is a great deal more that could be done on a technical level but by this time the scene was rather heavy so I left it there. I then tested USAnimation's Flash conversion process, converting a frame into a .swf file, the results of which can be seen in the Technical section.
Corporate Splash
The hemispherical relief look of the icons was again created using the shape's own mattes, positive and negative, to create automatic tones and highlights. The four complete icons were then rendered out as bitmap files. The background is a silver effect bitmap with the icons brought in blurred with their interiors unpainted, all offset locally within the XSheet. The spiral was created by first drawing their positions and aligning this scanned file correctly. The one spiral arm was positioned, duplicating the four icons three times each and then moving the 16 into position with the image modifiers. This could also be done in sceneplanning but would require 32 element columns rather than 4. Once this Camera network was assembled I duplicated it and changed all the image modifier values to their reverse while changing the actual order of the icons associated with the positions. Finally some positions were tweaked to give the best overall look and the whole piece was graded.
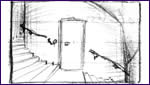
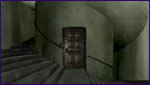
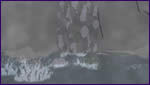
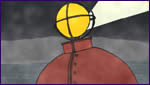
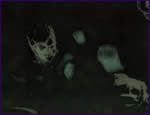
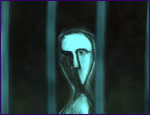
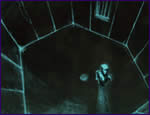
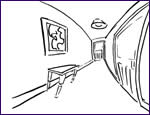
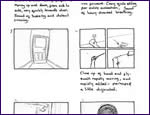
The Ice cream and the Prison Cell
Images 1 - 3 depict the cavernous space representing a near schizoid mind. Within the darkness, ghost like apparitions represent myriad facades and facets of the personality, while deep inside beneath them all, the true personality resides, imprisoned and held back (see image 1). I wanted to depict these images as if they were the random after images and the ghostly transitory shapes that you see when your eyes are closed and you are about to dream. To achieve this I used my mist FX (again! - see Storm) as subtle visual background noise, and scanned in the personalities as greyscale images - first bringing them in as mattes to cut away the mist and then using shrink modules in conjunction with glow modules to re-introduce the ghost like lines. The resulting black edge around the glow offered the kind of discontinuity you find with bad colour separation overlay and so suggesting a disjointed unsettling reality. The mist, as with Storm, was counter rotated while the camera moved in. Similarly, the faces were rotated and mixed into view over time.
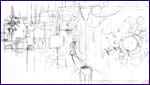
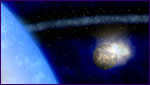
Spacefield Spacefield indulged the sci-fi geek in me. Could USAnimation be used to create a near photo realistic spacescape with the kind of sumptuousness you might now see on LEX?
The Earth-like planet was created using a curved, blurred reveal matte. On its lowest level I found some archive material of a revolving Earth, here only partially visible as patches of green and brown in the lower left corner. Over the top of this I added a semi-transparent blue and yet another version of the mist to create clouds, pegged to move right to left. The PAL material of the earth rotated right to left while the whole planet matte was pegged to move across screen right to left, in front of its attendant moon. I then used radially blurred negative and positive versions of my planet matte to create both an atmospheric haze off the surface as two levels, and a gradually more transparent blue atmosphere over the PAL material; hopefully giving a seamless blend through to where the archive footage is visible. For the Moon I merely drew an earth land mass, flopped it and replaced the painted colours with textures. I then used its matte to automatically create a tone for it's south western side, and fed the combined level beneath itself through a blur module to take its edges out of focus a little. The moon was pegged to rotate around the planet from the lower right of screen to the upper left. The Sun was just a rough oval put through a number of different glow modules and expand/shrink matte modules. Two levels of glow were also placed above the planet to create glare. There is a point in the animation where the sun, moon and planet dissect. To produce the sunflare (not shown) I drew a circle and duplicated it as a glow on a number of levels. Each was then pegged to rapidly expand out of shot and mix out towards the end of its expansion. This was coupled with a set of cross hair glows that mixed in then out over the course of the effect. The whole sequence was rendered at film resolution as a pre-production test for 'Tuesday' which was ultimately transferred onto film.
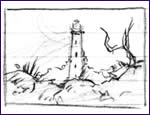
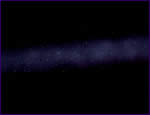
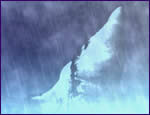
Storm
I developed the mist effect by counter rotating two large bitmap scans of textured paper and assigning glows and highlights to the light and dark greyscale values of that paper. In this particular case I then created two graduated mattes, using a gradient module to separate the mist up. This enabled me to intensify and re-colour the mist in the lower third of the shot. I later used this technique extensively to create swamp mist in the Bafta nominated film Tuesday, directed by Geoff Dunbar with executive producer Sir Paul McCartney. I then created Rain & Snow FX (seen here). Rain was produced by taking one drawing of random dots (also used to create the stars in Spacefield) and applying a directional blur to them. This level was then repeated three times with slightly varying angles applied to the directional blur, and the artwork resized to give an impression of depth (this project was completed before the introduction of USAnimation's multiplane 3D space). Having attached each level to a separate peg moving them N/W to S/E, I then fed the output in Camera through several modifiers effectively duplicating my output and offsetting it to create a continuous pan of rain. For the snow (not shown), the same overall structure was kept, but the directional blur was replaced with a radial blur and glow, and the N/S pans made more random and meandering. The mountain is a photo-manipulated found bitmap image to which I allocated an embedded matte.
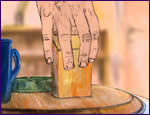
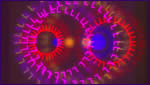
Love Is All
First of all I pegged the L so it had one movement from centre of screen to out of shot. Then within Camera I fed the L through 6 separate image modifiers , each offset by 15 degrees. I flipped and flopped each of these, the result being a circle of 24 L's expanding outwards. These L's were then sent through glow modules, further expanded and offset to create secondary much more diffused levels, and attached to further E/W pegs to create the offsets seen here.
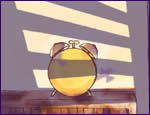
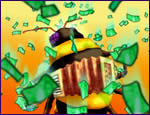
Honeywell
In this case I painted texture's for the bee's segments, but scanned them in as black and white files in order to have control in Canvas, the USAnimation image manipulation programme, of their exact colours. The texture mapping module in Camera is able to produce a box that expands and contracts to the furthest N/S and E/W edges of any given painted region, so there was no problem in placing them. This meant that the texture in the accordion concertina pulls in and out accordingly. The money was one cycled level that I repeated several times as off-set levels, re-sizing them and using blurs and colour changes to give the impression of depth. The money also used a scripted facility to map the note texture into each individual region. This is a fast and effective way of using many textures and was used extensively on the 'Have I Got News For You' title sequences. The money also employed a directional blur to enhance its downward motion. Finally, after applying tones, highlights, lowlights and a background gradient, I applied an 'add grain' module to the bee's legs and arms to give the slightly pocked look of chit chin.
<< Prev Gallery: Rostrum |
Home |
History | Gallery
| Clients | Press
| Services |
Rates | Technical
| People | Map
| Contact | Links |
|
| |
|
|
||||||||||||||||||||||||||||||||||||||||||||||||||||||||||||||||||||||||||||||||||||||||||||||||||||||||||||||||||||||||||||||||||||||||||||||||||||||||||||||||||||||||||||||||||||||||||||||||||||||||||||||||||||||||||||||||||||||||||||||||